First Day of Research
First Video
This video was basic information that I already knew.
Second Video
The first tip in this video was to get an oven thermometer. Most ovens are inaccurate in temperature. Most home ovens can be off to up to 25 degrees on average which can really affect your baked goods. Placement of oven rack: if you bake something on the bottom rack it will brown too quickly. You also shouldn’t bake too many things at once because the distribution of heat is altered. Baking one thing at a time allows for better results. Convention vs convection: a convection oven has a fan and an exhaust system inside that helps circulate the heat. This creates an even heat throughout the oven and will bake the goods faster. A lot of times in recipes it will say to rotate the tray of baked goods half way through to get an even bake, but with a convection oven you don’t have to do that since the heat is evenly distributed. Since the hot air is constantly being blown around, it actually creates a dryer climate and it will make your dessert brown more easily. Below are two pictures of cookies. Both are baked from the same batter, for the same amount of time, and in the same temperature. The only difference is that the first cookie was baked with a convection oven while the second was baked with a convection oven.
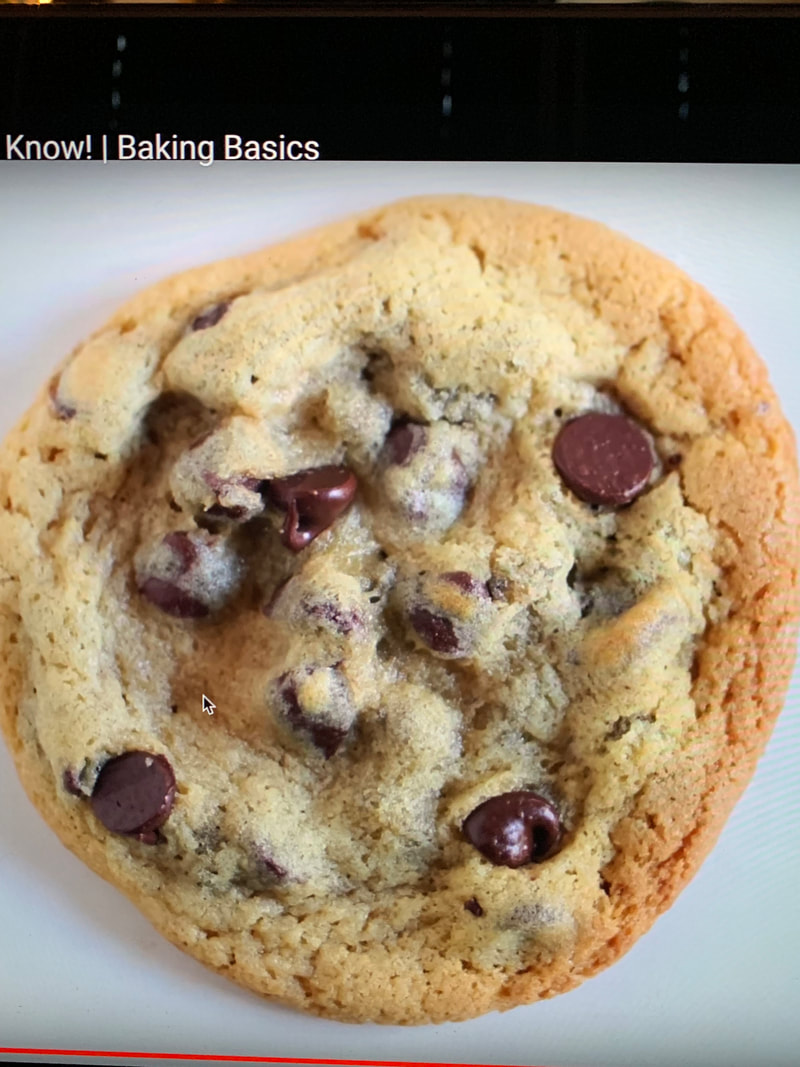
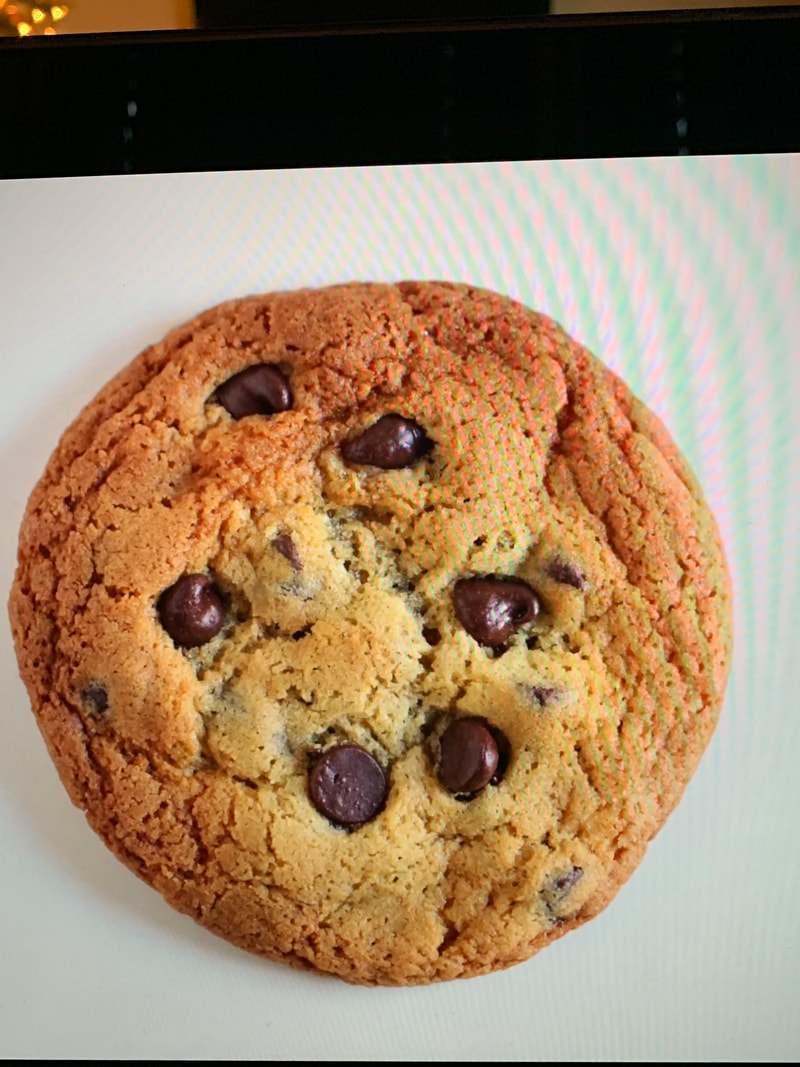
As you can see, the cookie baked in a convection oven browned much more than the cookie bakes in the convention oven. This video recommends convection oven for non-delicate desserts like cookies or pies. Since the dessert browns faster, the video also recommends that you reduce the heat in the oven by 25 degrees if using a convection oven. You may also need to bake for slightly less time. For cakes or soufflés however, a convection oven was recommended because of the even heat circulation. While the video does not explicitly say why, I would assume it would be because the convection oven bakes faster than a convention which wouldn’t be good for delicate desserts.
After reading about the oven thermometer, I did some research about which one would be the best to get. the more research I did, the more i found how much professional chefs stress the importance of an oven thermometer. I found that dial face model thermometers are better than bulb thermometers because the bulb contains tinted alcohol that dries up over time and gives false temperatures. I found that a recommended oven thermometer was the CDN DOT2 ProAccurate Oven Thermometer. I find that when I’m following recipes, I often need to bake the dessert for an extra 5 or 10 minutes to make sure it is properly baked. I went on Amazon and ordered this thermometer for my oven! I will make sure to blog about using it the next time I bake.
After reading about the oven thermometer, I did some research about which one would be the best to get. the more research I did, the more i found how much professional chefs stress the importance of an oven thermometer. I found that dial face model thermometers are better than bulb thermometers because the bulb contains tinted alcohol that dries up over time and gives false temperatures. I found that a recommended oven thermometer was the CDN DOT2 ProAccurate Oven Thermometer. I find that when I’m following recipes, I often need to bake the dessert for an extra 5 or 10 minutes to make sure it is properly baked. I went on Amazon and ordered this thermometer for my oven! I will make sure to blog about using it the next time I bake.
Third Video
Baking powder and baking soda are caked leaveners. Baking powder has baking soda in it and an acid that will react to the baking soda. This create a bubbling reaction which allows the baked good to rise. Baking soda needs acid and liquid in order to activate and make the mixture rise. The temperature of the ingredients is important, though the video doesn’t say why. To bring eggs to room temperature faster you can but then in some room temperature water to help make them slightly warmer. To soften butter, you can warm a bowl in the microwave and place it over the butter. In the past, I have just microwaved my butter to soften it, which you really shouldn’t do because then it looses some structure. If the butter is too cold it won’t blend with ingredients as well. White sugar vs brown sugar in cookies: white sugar makes the cookie spread more and makes it crunchier. For a more chewy cookie, you can use brown sugar (the molasses in the brown sugar makes it chewier and thicker). Measuring ingredients using weight vs measuring cups is much more accurate. This is something I noticed while working in the bakery: the ingredients are always measured by weight. The type of cake will depend on the ratio of fat, sugar, and flour. For example, a pound cake is equal ratio of fat, sugar, and flour, resulting in a denser cake. It also has no leaveners, making it not rise quite as much, also leading to a denser cake.
For cakes: When beating sugar and butter together, you should actually beat them together until you can’t feel the sugar granules, which takes about 5 minutes. This was very surprising to be as when I usually cream the two together, I probably cream for only 2-3 minutes! This will increase the fluffiness because of how much air is being beaten in, and it will give the butter more structure. This actually results in a white mixture rather than yellow. When you add eggs, you should only add them one at a time. If you add them too quickly, the video explained that the mixture can actually split because the creamed butter and sugar can’t absorb too much liquid at a time. When adding in the dry ingredients, you should always sift them. This was another thing I noticed at the bakery that I hadn’t tried too much of when baking on my own. Sitting in the dry ingredients will help incorporate everything more evenly and gets rid of any bumps. It will also help the batter develop gluten which is important for structuring the batter to make batter light and fluffy. If you mix the dry ingredients in without sifting, they are mixed in too quickly and don’t have time to develop the gluten.
For brownies: You don’t have to be as precise when beating in wet ingredients because you don’t need the mixture to be as light and airy. When putting in dry ingredients, you should still sift all ingredients for an even distribution. You also need to work quickly to get the batter into the oven. This is because the cocoa powder and baking soda are creating a chemical reaction, even before you start baking.
Second Day of Research
Macaron Problems:
Hollow shells: hollow shells could be caused by the under whipping of the egg whites. To fix this, you need to make sure the egg whites form stiff peaks. It could also be caused by over mixing the egg whites. If the egg whites are over mixed they will look duller and start to collapse in on itself. If this happens, you should rewhip new egg whites.
Shells are lopsided/not round: This is probably caused by the piping technique. If you do not pipe from the middle and let the batter spread out, your shells may not be rounded or even. You’re pipe tip may also be clogged so you need to clean it out. If it is not the piping that is making the macarons lopsided, the issue may be that the batter is not completely mixed. This could result in bumps in the batter which would lead you to have uneven macarons.
The shells are very flat: The reason that you might have flat shells that do not rise is that the batter is over-mixed. This means that there will not be a lot of air in the batter, which will lead the macaron to not rise once in the oven. If you realize that you have over-mixed the batter, you will have to start over.
The tops of the shells are cracked: One reason the shells crack is because you didn’t get all of the excess air bubbles out of the macaron when you hit the bottom of the tray to the counter. Make sure to do this thoroughly and to flip the tray in case you accidentally missed some spots. It could also be that there is un uneven heat in the oven. To fix this, make sure you are only baking one tray at a time. Finally, it could be that the meringue was not stiff enough. Fix this by making sure stiff peaks form when whipping the egg whites.
Macaron feet spread: If the feet of the macarons are spreading, it is likely that the temperature in your oven is too high. Turn down the temperature and make sure to closely watch the macarons.
Tips for making a great cannoli:
Dough: The dough of a cannoli shell should be sturdy but also with some give. It shouldn’t be too fragile. If you have a pasta machine, it will make it easier to get a perfectly even layer of dough. You can also set the machine to give you a certain thickness so that the dough is the perfect thickness. In this case, the dough should be about 1/16-inch thick. Apparently, this thickness will allow the dough to be sturdy enough to hold filling, but still delicate enough to make it flakey.
Frying the dough: Frying the dough is the trickiest part of making a cannoli. You need to make sure that the oil stays at 375 degrees Fahrenheit. If the oil is too hot, the shells will puff up too much. If the oil is too cold, the shells will be greasy.
Filling: While making the shell is the harder part of the cannoli, you can still make mistakes when making the filling. You should be sure to drain the ricotta cheese. Ricotta tends to be a little runny. You can do this by leaving the ricotta to drain in a cheesecloth lined sieve. It is also a good idea to then press the ricotta through a strainer. This will make the filling nice and smooth. Also be sure to not add too much sugar to the filling. This will make the filling much looser and it won’t stay in the cannoli as well.
Third Day of Research: Dough
Kneading Dough
Kneading dough is very important for bread because it helps develop the gluten, which makes for a fluffy, airy bread. Use a silicone mat and put flour on it so that the dough doesn’t stick to the mat. Make sure to flour your hands too so that the dough doesn’t get stuck. When needing, take the farthest end of the dough and fold it over toward you. Use the heals of your hands to push the dough back out and down into itself. You may need to continuously put flour down if the dough is too sticky. While needing, you want to give the dough a quarter turn and continue to fold the dough over and knead it out. This will ensure that the dough is kneaded evenly. Continue this process for about 10 minutes. After 10 minutes, the dough should be mush less sticky and more elastic. Once the dough is kneaded, it is time to prove it.
Proving Dough
Proving dough is the process by which yeast dough rises. When the yeast is in the bread, it begins to eat the starches in the flour. This makes air bubbles which causes the dough to rise. The best place to prove dough is a place that is warm and moist. There are proving boxes, however most people just use their oven. This can be done by turning on your oven for just 2 minutes and then turning it off. After the 2 minutes, fill a boil with boiling water and put it in the oven. Let this sit in the oven while you make the dough. Once the bread is done, put it in the oven with the bowl of boiling water. At this point the oven should be warm and moist, making for a great environment to prove bread.
How to Know When the Bread is Done Baking
To know when the dough is ready, you can take it out of the oven and tap the top. If it sounds hollow it is baked. This may be difficult, so to ensure the bread is baked, but a thermometer on the inside of the bread. The thermometer should read about 190 degrees or above.
Things That Can Go Wrong and Why
Dough is too sticky: While dough is supposed to be sticky, it should be too sticky. If it is it could be for a few reasons. 1) You didn’t add enough flour. The amount of flour can also vary 1/2 cup depending on the climate you are working in. 2) The flour is too old. 3) The type of flour may not have enough gluten in it. Make sure to use the flour recommended by the recipe because the type of flour you use can affect the bread.
Dough didn’t rise enough:
1) The yeast is too old. Yeast is actually a living thing, so if it is too old it might be dead. 2) The water you added to your dough was too hot or too cold. If it was too cold, the yeast cannot grow. If it was too hot, the yeast will die. 3) There is too much salt. This can also kill the yeast.
The dough is too tough:
1) The dough did not rise enough. Yeast can grow at different paces, so you may need to prove the dough longer than the recipe says if the yeast has not grown enough. Patience is key. 2) Where you proved your yeast was not warm enough. This can cause a delay in the yeast growth and take it longer to rise. 3) You may not have used enough yeast.
Bread is gooey:
1) Your oven is too hot. If the oven is too hot, the bread will bake too quickly and it will only bake the outside of the bread and not the inside. 2) The bread may not have been baked long enough. This will obviously cause it to be undercooked and gooey.
The bread “exploded”
1) The bread proved for too long. This will make the bread too big and will have a very holy texture on the inside. 2) You used too much yeast. 3) The oven isn’t warm enough. If the oven is too cool, the bread will just continue to prove and grow instead of bake. The bread will not be able to form a nice crust.
